Try It Yourself
Welcome to the Academy. The place to build your own flows! The goal of this course is to familiarize you with our no code integration platform so that soon you can build your own integrations.
This introduction is divided into two parts:
- In the Demo Examples section you'll find all the information to guide you through the predefined examples that are already in your demo environment. You'll learn about the interface, components, and basic integration patterns.
- In the Build Your First Flow section you'll be guided through the process of building your first integration, or as we call it, flow.
Don't hesitate to contact us if you have any questions or remarks.
Have fun!
Demo Examples
Goal & Requirements
The goals is to have a first look at the platform to:
- Familiarize yourself with the application and interface
- Get an idea of how a messaging system works
- Show you how to build integrations with it
Learning Objectives
- Introduction to Flow Manager and Flow Designer
- Understand the concept of no code and interactions between components
- Make minor adjustments to existing flows and observe the results
- How to use Academy for documentation
- The concept of a messaging system, specifically HTTP calls
Requirements
- Your demo account with the examples
- About 1 hour of your time
If you are not familiar with HTTP calls, please review the reference material on HTTP calls first before proceeding. If you already have a basic understanding of HTTP calls, feel free to continue below.
1.GetCountryInfo example
You will get a first look at the user interface and how no code integration works. You'll be able to initiate a flow, see the result, and familiarize yourself with the basic components and their functionality at each step of the flow.
Make sure you are logged into your demo account and navigate to the Flow Designer. The video below will walk you through this example and additional details or comments can be found in the guide below the video.
Flow description
This example flow uses country ISO codes (Alpha-2) to get a Country's Capital and Name. It uses an open API, you can find the full reference here.
Using this Flow
The Inbound HTTPS component is waiting for an HTTP request to iniate the flow. You can send this request by clicking the URL on the Notes tab in the Flow Designer.
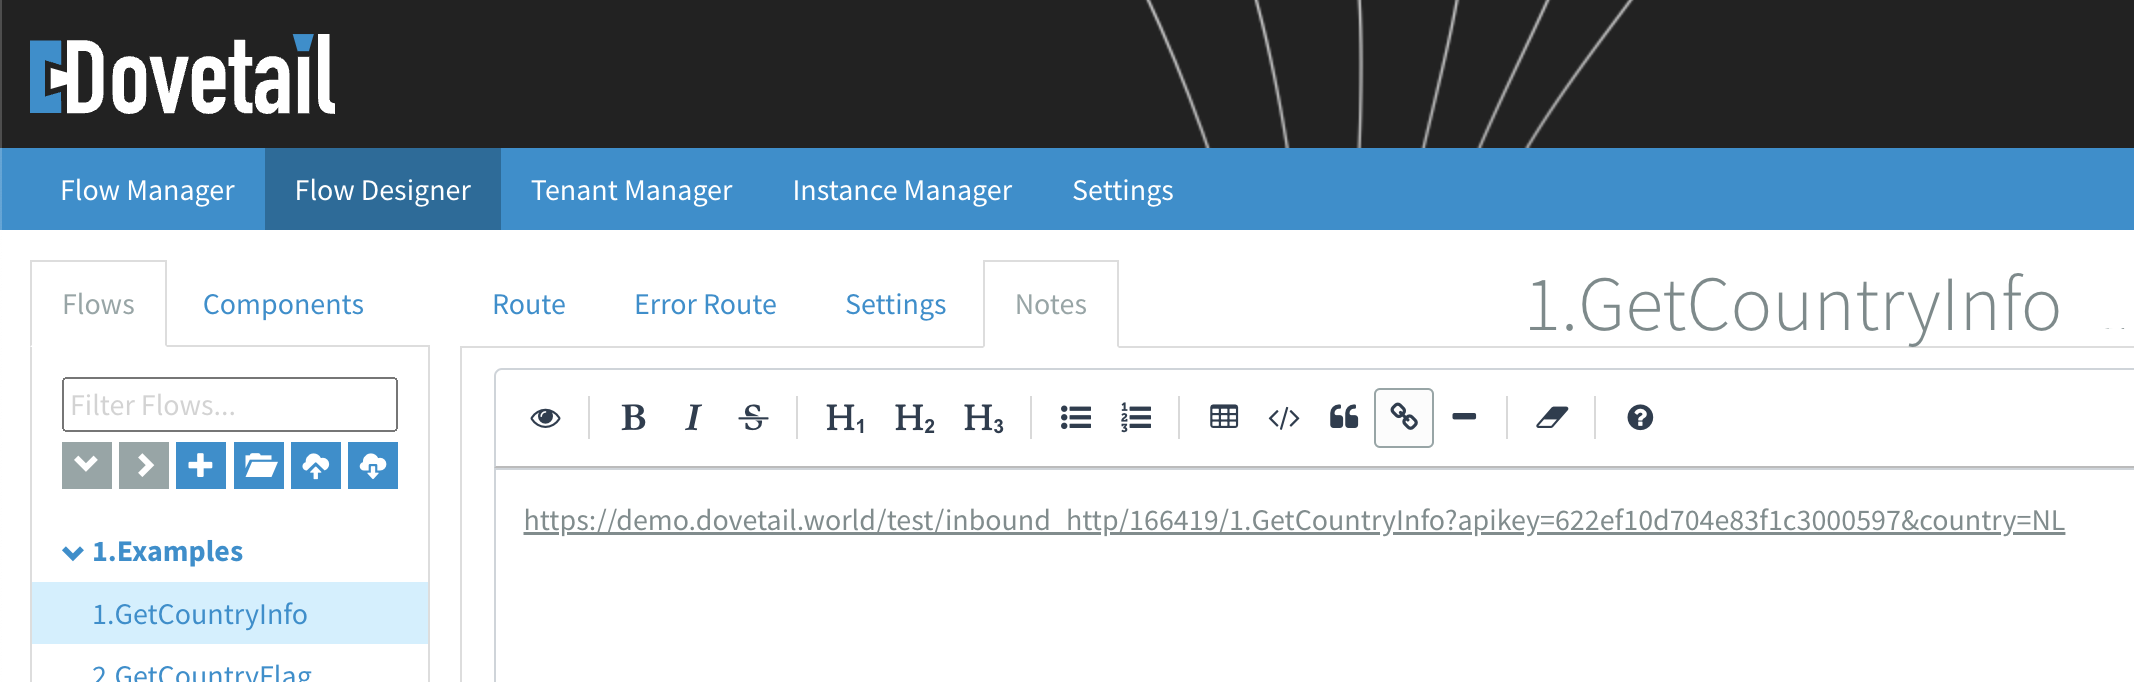
Note the country=NL part of the URL. Changing NL to any other existing ISO code will return its corresponding data. Give it a try!
What are the components doing?
There are a few ways to get information about how this flow is functioning.
Go to the Route tab and:
- Hover over a component to display the first few lines of its component note.
- Click the
icon above a component to view its full notes. - Click the
icon above a component to view its configuration. - Want to learn more about a component?
Click theicon in the component configuration to open its documentation in the Academy.
- Want to learn more about a component?
Can you figure out how the components are interacting to produce the desired goal of retrieving a country's capital and name from its ISO code?
Explanation
Following the URL in the Notes initiates this flow by sending an HTTP request to the Inbound HTTPS component. After the ? in the URL, two parameters are sent along with the request. These parameters are received as headers:
apikey=622ef10d704e83f1c3000597country=NL
The Filter component verifies the apikey header against a flow property named flowkey. Flow properties are defined in the Flow Settings. This filtration serves as an additional layer of security, allowing only incoming messages with the correct apikey to pass through the Filter component.
Next, a JSON body containing a sCountryISOCode key with the value specified in the country header is constructed in the SetBody component, in accordance with the API documentation. The SetHeaders component sets the Content-Type header as required by the API. Additionally, a header named Endpoint is set for later use.
The HTTP component handles the API call, it sends a POST request to the specified URL and waits for the API to respond. The URL is constructed from the flow property named url appended with the value of the Endpoint header, resulting in the HTTP endpoint:
http://webservices.oorsprong.org/websamples.countryinfo/CountryInfoService.wso/FullCountryInfo
The Remove Headers component removes all the headers from the response message. Since they are no longer needed, cleaning them up is considered good practice. The JSON to XML Simple component then converts the message body from JSON to XML. Subsequently, XPath expressions in the SetHeaders component extract data from the XML body and set it onto two headers named capitalCity and countryName.
The Content Router component checks the capitalCity header. If it is not empty the top route is followed, otherwise the flow proceeds along the bottom route.
The SetBody component in the top and bottom route is used to construct the message body that is returned to the inbound request. In the top route, the body is an XML where the values of the capitalCity and countryName headers are inserted into their respective elements. If the capitalCity header is empty, the body in the bottom route is constructed with the plain text: 'Capital city is empty.'
Finally, the message is logged to the Flow Manager using the Log component. We will cover the Flow Manager in more detail in the next example.
Because all components with an Exchange pattern option are configured as Request reply, the state of the message after the last component is returned to the inbound request. In this example, the message after the Log component is the response to the HTTP request that initiated the flow.
2.GetCountryFlag example
You will look at an example flow and determine how it works. Use the Flow Manager logs and transactions in your toolbox to analyze the state of a message as it flows through the integration.
The video below will walk you through the example and additional details or notes can be found in the guide below the video.
Flow description
This example flow uses country ISO codes (Alpha-2) to get a Country's Flag. It uses an open API, you can find the full reference here.
Using this Flow
Follow the URL in the Notes of the flow again to iniate it. The flow will display a picture of the flag in your browser as a response, in this case the Dutch flag. Changing NL to any other existing ISO code will return the corresponding flag. Give it a try!
What are the components doing?
There are a few ways to get information about how this flow is functioning.
Go to the Route tab and:
- Hover over a component to display the first few lines of its component note.
- Click the
icon above a component to view its full notes. - Click the
icon above a component to view its configuration. - Want to learn more about a component?
Click theicon in the component configuration to open its documentation in the Academy.
- Want to learn more about a component?
Use the Flow Manager - Transactions to view the message (body, headers and properties) at each step of your flow. Each step displays the message as it enters the selected component.
Use the Flow Manager - Logs to see general log entries and/or the message content at a Log component.
Can you figure out how the components work together to achieve the desired goal of retrieving a country's flag from its ISO code?
Explanation
The setup for the first HTTP call is indentical to the flow in the first example, but in this case we are interested in the URL where an image of the flag resides. In the Flow Manager - Transactions of this example, you can see that the link to the flag is embedded in the response body from the first HTTP call. To view the HTTP response click on the component following the first HTTP component.
The JSON key named sCountryFlag contains the flag URL. After converting the response body to XML, we use an XPath expression to set this URL on a header named flagUrl. This header is used in the second HTTP component to request the flag image.
The headers are removed again and the message is logged to the Flow Manager - Logs with the Log component.
Like in the first example, all the components with an Exchange pattern option are configured as Request reply. Therefore, the state of the message after the Log component, which includes an image of the flag in its body, is returned to and displayed in your browser.
3.GetCountryLanguages example
You will look at an example flow and analyze in more detail how the data is processed within the integration. The video below will walk you through the example and additional details or notes can be found in the guide below the video.
Flow description
This example flow uses country ISO codes (Alpha-2) to get the Country's Language(s). It uses an open API, you can find the full reference here.
Using this Flow
Follow the URL in the flow Notes to iniate the flow and the flow will display a list of languages in your browser as a response, in this case Dutch and Frysian. Changing NL to any other existing ISO code will return the corresponding language list. Try it!
What are the components doing?
There are a few ways to get information about how this flow works.
Go to the Route tab and:
- Hover over a component to display the first few lines of its component note.
- Click the
icon above a component to view its full notes. - Click the
icon above a component to view its configuration. - Want to learn more about a component?
Click theicon in the component configuration to open its documentation in the Academy.
- Want to learn more about a component?
Go to the Flow Manager - Transactions to view the message (body, headers and properties) at each step of your flow. Each step displays the message as it enters the selected component.
Go to the Flow Manager - Logs to see general log entries and/or the message content at a Log component.
Reset the ISO code to a country that returns at least two languages, i.e. NL. Can you figure out how the components interact to subtract multiple languages from the same language element in the response?
Explanation
The setup for the first HTTP call is indentical to the flow in the first example. When you examine the HTTP response in the Flow Manager - Transactions of this example, you can see that the JSON response body includes an array named Languages that contains the country's language(s).
After converting the response body to XML, the Split component uses an XPath expression to split the message body into multiple messages. Each Languages element is sent out of the bottom route in a seperate message. For example:
<Languages>
    <sISOCode>fry</sISOCode>
    <sName>Frisian</sName>
</Languages>
<Languages>
    <sISOCode>nl</sISOCode>
    <sName>Netherlands</sName>
</Languages>
In the bottom route, the SetHeaders component uses an XPath expression to set the value of the sName element on a header named languageName. A SetBody component then constructs an XML body using the value of the languageName header. The body is subsequently converted to JSON using the XML to JSON Simple component, and the message is logged.
Since the Split component has Aggregation set to JSON, it aggregates each valid JSON body at the end of the bottom route into a single message that is sent out of it's right output. The final result, a JSON containing the country's language(s), is logged and displayed in the browser (following the Request reply principle again).
These three examples demonstrate how integrations are developed as flows. Now you're ready to Build Your First Flow from scratch!
Build Your First Flow
Goal & Requirements
Build your first flow that retrieves data from an API with movies that are on Dutch TV today (Filmtotaal API), and enrich the response with data from another movie database (OMDB API).
Learning Objectives
- Apply the concept of HTTP calls (requests & responses) in a real-world example
- Use the Flow Designer to create, build, and install flows
- Use Flow Manager for status information and debugging
- Authenticate & connect to APIs and read their references
- Learn useful tools, techniques, and references
Requirements
- Your demo account
- API key from filmtotaal.nl (
dvfrbql1qvltlvyed4y7a9cwx64vfzjs) - API key from OMDB, the OpenMovieDataBase (
6ef8ad67) - Postman (A tool to create requests, download)
- Visual Studio Code (A powerful text editor, download)
- About 2 hours of your time
Syntax is highlighted in code blocks throughout this guide. You can hover over a code block and a copy icon will appear in the upper right corner. Whenever you copy something from this guide into a flow, make sure there are no extra characters or spaces in the field.
Example: Hover over me!
1. Hello World!
You will learn how to set up and connect to a flow by sending a request to a flow and responding with the classic "Hello World". Please follow the tutorial video below in your own demo environment. Make sure you are logged into your demo account and have Postman (download) available.
Resources & References
- Application > Flow Designer
2. Authorization
Now it is time to introduce you to headers and Flow properties. We'll use them to add an extra layer of security to the inbound URL.
Syntax & Expressions
#{flowkey}
${header.Authorization}
${header.Authorization} == '#{flowkey}'
Resources & References
- Guides > References > Using Simple expressions
- Application > Flow Designer > Flow Settings
3. Transactions
Sometimes something doesn't work the way you expect, you're debugging, or you're curious about the state of your flow at a particular point? Transactions show a message while it 'moves' between components. We'll use the same flow as in the previous section.
Each step displays the message as it enters the selected component. Look at the next component if you want to see how the component before it 'interacted' with the message.
Resources & References
- Application > Flow Manager
4. Your first API call
Now let's connect to the Filmtotaal API to retrieve an XML with information about the movies on Dutch TV today. Make sure you've got the Filmtotaal API key at hand (dvfrbql1qvltlvyed4y7a9cwx64vfzjs).
Syntax & Expressions
${date-with-timezone:now:Europe/Amsterdam:dd-MM-yyyy}
#{FILM_url}?apikey=${header.apikey}&dag=${header.day}&sorteer=${header.sort}
${header.dynamicURL}
Resources & References
- Filmtotaal API - http://api.filmtotaal.nl/
- Guides > References > Using time
Click the
5. Splitting XML's
Now it is time to show you how to get the data in the <film> element into separate 'blocks' so that we can process individual movie data later. We're going to learn a technique called XPath and then show you how it is done. We'll pick up where we left off in the section Your first API call.
Syntax & Expressions��
//filmsoptv/film
Resources & References
- W3 Schools - XPath Tutorial
- XPath Tester - https://www.freeformatter.com/xpath-tester.html
- Guides > References > Using XPath expressions
6. Enrich with OMDB data
In this section we will take the individual movie titles after the split and put them on a header. We will use the XML file with the list of movies as retrieved in Your first API call. We use each movie title from the Filmtotaal response to make a call on the Open Movie Data Base (OMDB API key: 6ef8ad67), enriching the data.
Syntax & Expressions
//titel/text()
#{OMBD_url}?apikey=${header.apikey}&t=${header.title}
Resources & References
- OMDB reference - https://www.omdbapi.com/
- W3 Schools - XPath Tutorial
- XPath Tester - https://www.freeformatter.com/xpath-tester.html
- Guides > References > Using XPath expressions
- Guides > References > Using Simple expressions
7. Using XSLT
The last technique we would like to introduce you to is XSLT. Often you want to 'translate' an element in a source XML to an element with another name or format in a target XML. We call this mapping and use XSLT for this. Here you can download the XSLT file that was built with MapForce to use in your flow.
Resources & References
- XSLT file - MappingMapToMoviesOuput.xslt
- W3 Schools - XSLT Introduction
- W3 XSLT tool - XSLT editor
- Guides > Tutorials > Creating XSLT's with MapForce
References
HTTP calls
The Demo examples in this guide use an open data source (API) that provides country data.
You send an HTTP request to the API to retrieve data from it. An HTTP request consists of a request-line, request header(s), and optionally, a request body.
Using the analogy of sending a letter:
- Request-line — The address on the envelope
Specifies the location to send the request, the action to perform and the protocol to use. - Request headers — Additional metadata on the envelope
Might include details like a return address, the size of the letter (body) or a stamp validating access to the service. - Request body — The letter itself
Contains the main payload of the request, often formatted as XML or JSON.
The API replies to your request with an HTTP response. An HTTP response consists of a status-line, header(s), and optionally, a body.
Using the analogy of receiving a letter:
- Status-line — Delivery status on the envelope
Includes a response code (number) and response text describing the request's status. - Response headers — Additional metadata on the envelope
Similar to the request, might include information like the sender's name, return address or validation details. - Response body — The letter itself
Contains the main payload of the response, often formatted as XML or JSON.
Below, we will go into more detail about HTTP requests and HTTP responses.
HTTP request
The API documentation (see the JSON section) provides details on how to construct an HTTP request.
POST /websamples.countryinfo/CountryInfoService.wso HTTP/1.1
Host: webservices.oorsprong.org
Content-Type: application/json; charset=utf-8
Content-Length: 101
{
  "sCountryISOCode": "NL"
}
Request-line
The first two lines define the request endpoint, the action to perform and the protocol to use:
POST /websamples.countryinfo/CountryInfoService.wso HTTP/1.1
- Action to perform:
POST - Specific endpoint location:
/websamples.countryinfo/CountryInfoService.wso - Protocol:
HTTP/1.1
Host: webservices.oorsprong.org
- Host (URL of the endpoint):
webservices.oorsprong.org
The request is a POST to http://webservices.oorsprong.org/websamples.countryinfo/CountryInfoService.wso.
Request headers
The API specifies two headers that must be sent with the request:
Content-Type: application/json; charset=utf-8
- The type and encoding of the content in the body:
application/jsonandcharset=utf-8respectively
Content-Length: 101
- The size (in bytes) of the content in the body:
101(bytes)
Both headers provide additional information about the body; its content type and length.
Request body
To indicate which data should be returned, the request body must include a JSON containing the country's ISO code:
{
  "sCountryISOCode": "NL"
}
- The main payload of the request (in JSON format): it contains the ISO code for the country we want to request data for in a so called 'key-value' pair.
This body specifies we are interested in the country data for the Netherlands (NL).
HTTP response
The API documentation (see the JSON section) provides an example of the HTTP response.
HTTP/1.1 200 OK
Content-Type: application/json; charset=utf-8
Content-Length: 303

{
    "sISOCode": "NL",
    "sName": "Netherlands",
    "sCapitalCity": "Amsterdam",
    "sPhoneCode": "31",
    "sContinentCode": "EU",
    "sCurrencyISOCode": "EUR",
    "sCountryFlag": "http://www.oorsprong.org/WebSamples.CountryInfo/Flags/Netherlands.jpg",
    "Languages": [
        {
            "sISOCode": "fry",
            "sName": "Frisian"
        },
        {
            "sISOCode": "nl",
            "sName": "Dutch"
        }
    ]
}
Status-line
The status-line is the first line in the HTTP response above:
HTTP/1.1 200 OK
- It indicates your request was succesful:
200(response code) andOK(response text)
The response code and text are received as headers, they are named CamelHttpResponseCode and CamelHttpResponseText respectively. A full list of status codes can be found here.
Response headers
The API returns two headers in the response:
Content-Type: application/json; charset=utf-8
- The type and encoding of the content in the body:
application/jsonandcharset=utf-8respectively
Content-Length: 303
- The size (in bytes) of the content in the body:
303(bytes)
Response headers, including their names and values, are received unchanged as headers.
Response body
A body with the requested country's data is returned by the API:
{
    "sISOCode": "NL",
    "sName": "Netherlands",
    "sCapitalCity": "Amsterdam",
    "sPhoneCode": "31",
    "sContinentCode": "EU",
    "sCurrencyISOCode": "EUR",
    "sCountryFlag": "http://www.oorsprong.org/WebSamples.CountryInfo/Flags/Netherlands.jpg",
    "Languages": [
        {
            "sISOCode": "fry",
            "sName": "Frisian"
        },
        {
            "sISOCode": "nl",
            "sName": "Dutch"
        }
    ]
}
- The main payload of the response (in JSON format): it contains the requested country's data organised into 'key-value' pairs.
The response body is received unchanged as the body in the flow.
That is it for the basic explanation of how HTTP calls work. Depending on your purpose, you can use any of the data in the response to your advantage. You are now ready to dive into the 1.GetCountryInfo example.